Spring Security 使用浅析
Spring Security 使用浅析
常见类说明
认证过程中常见的类
| 类 | 说明 |
|---|---|
Authentication |
登录用户的角色信息及权限信息等,还包含 IP、SESSION 等信息,不同 Authentication 实现不尽相同。 |
AuthenticationProvider |
认证的提供者,真正起到真正作用的类。 |
AuthenticationManager |
认证处理器,内置一组 AuthenticationProvider 用于认证。当有一个 Provider 判定认证成功时,即判定认证成功。 |
AuthenticationEventPublisher |
用于发布认证成功 / 失败事件 |
SecurityFilterChain |
Spring security 自带的过滤器 |
鉴权过程中常见的类
| 类 | 说明 |
|---|---|
ConfigAttribute |
访问规则,包含需要访问权限的信息 |
SecurityMetadataSource |
存储并返回用户权限信息 |
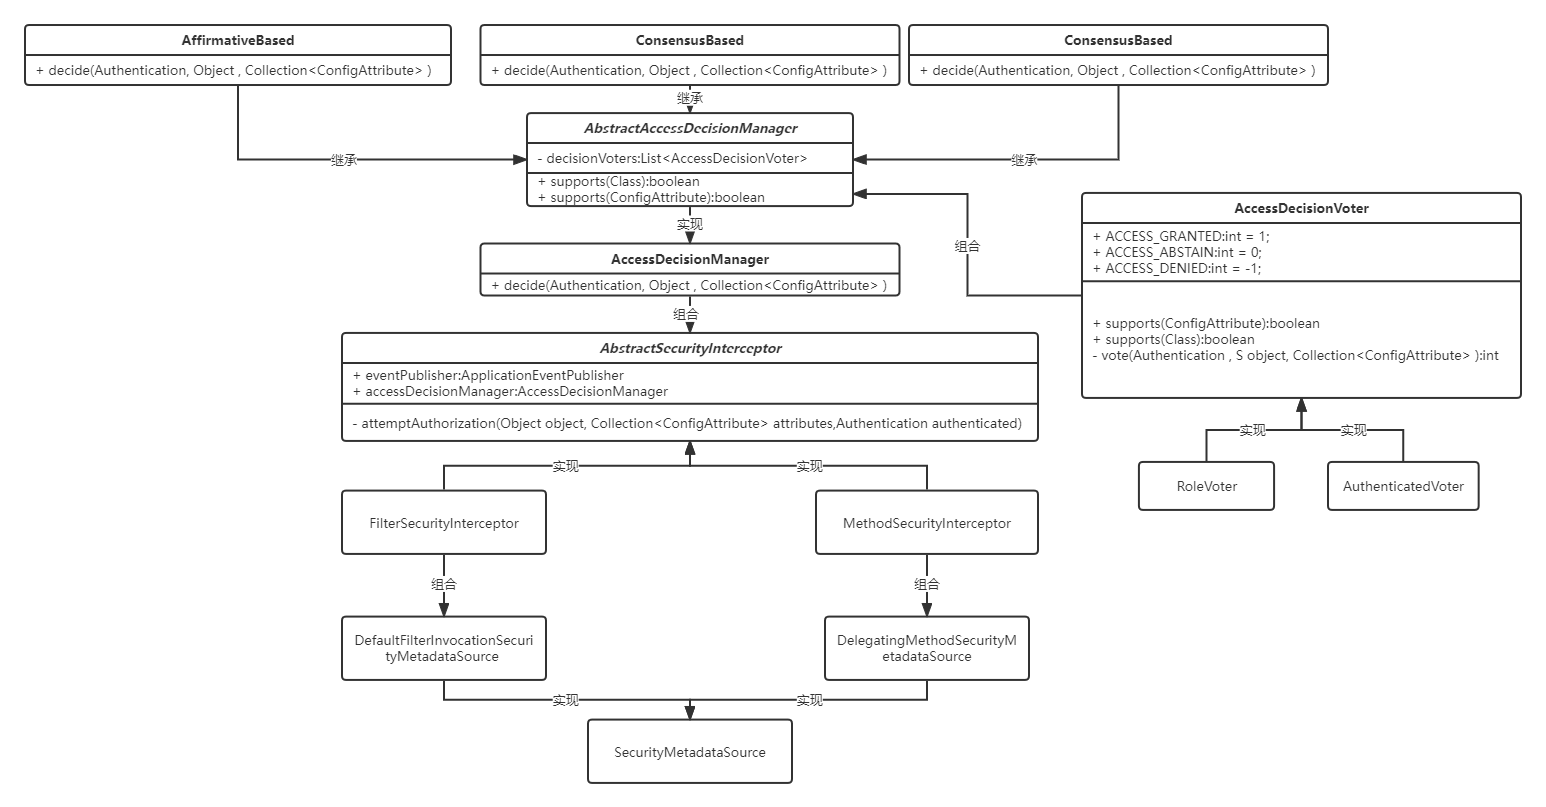
FilterSecurityInterceptor |
鉴权过滤器,一般位于 springsercurity 过滤器链中最后一个 |
AccessDecisionManager |
决策管理器,用于保存一组投票器 默认为 AffirmativeBased 类型 一票赞成ConsensusBased 少数服从多数UnanimousBased 一票否决 |
总体说明
什么是认证
认证就是认为前端传过来的 username 就是本人。
通过认证后:
- 如果当前已经有角色信息(
Authentication),可直接将其角色信息用于授权判断,或在应用业务代码中进行使用。 - 如果当前没有角色信息(
Authentication),仅根据username就可以直接去查询角色信息,并可直接将其角色信息用于授权判断,或在应用业务代码中进行使用。
什么是授权
授权是已认证的用户中的权限(GrantedAuthority)能否访问某个资源。
两种授权方式:
web授权,通过指定url指定权限方法授权,基于aop,通过在spring代理类方法上加入如@PreFilter的注解来增加权限
重点流程说明
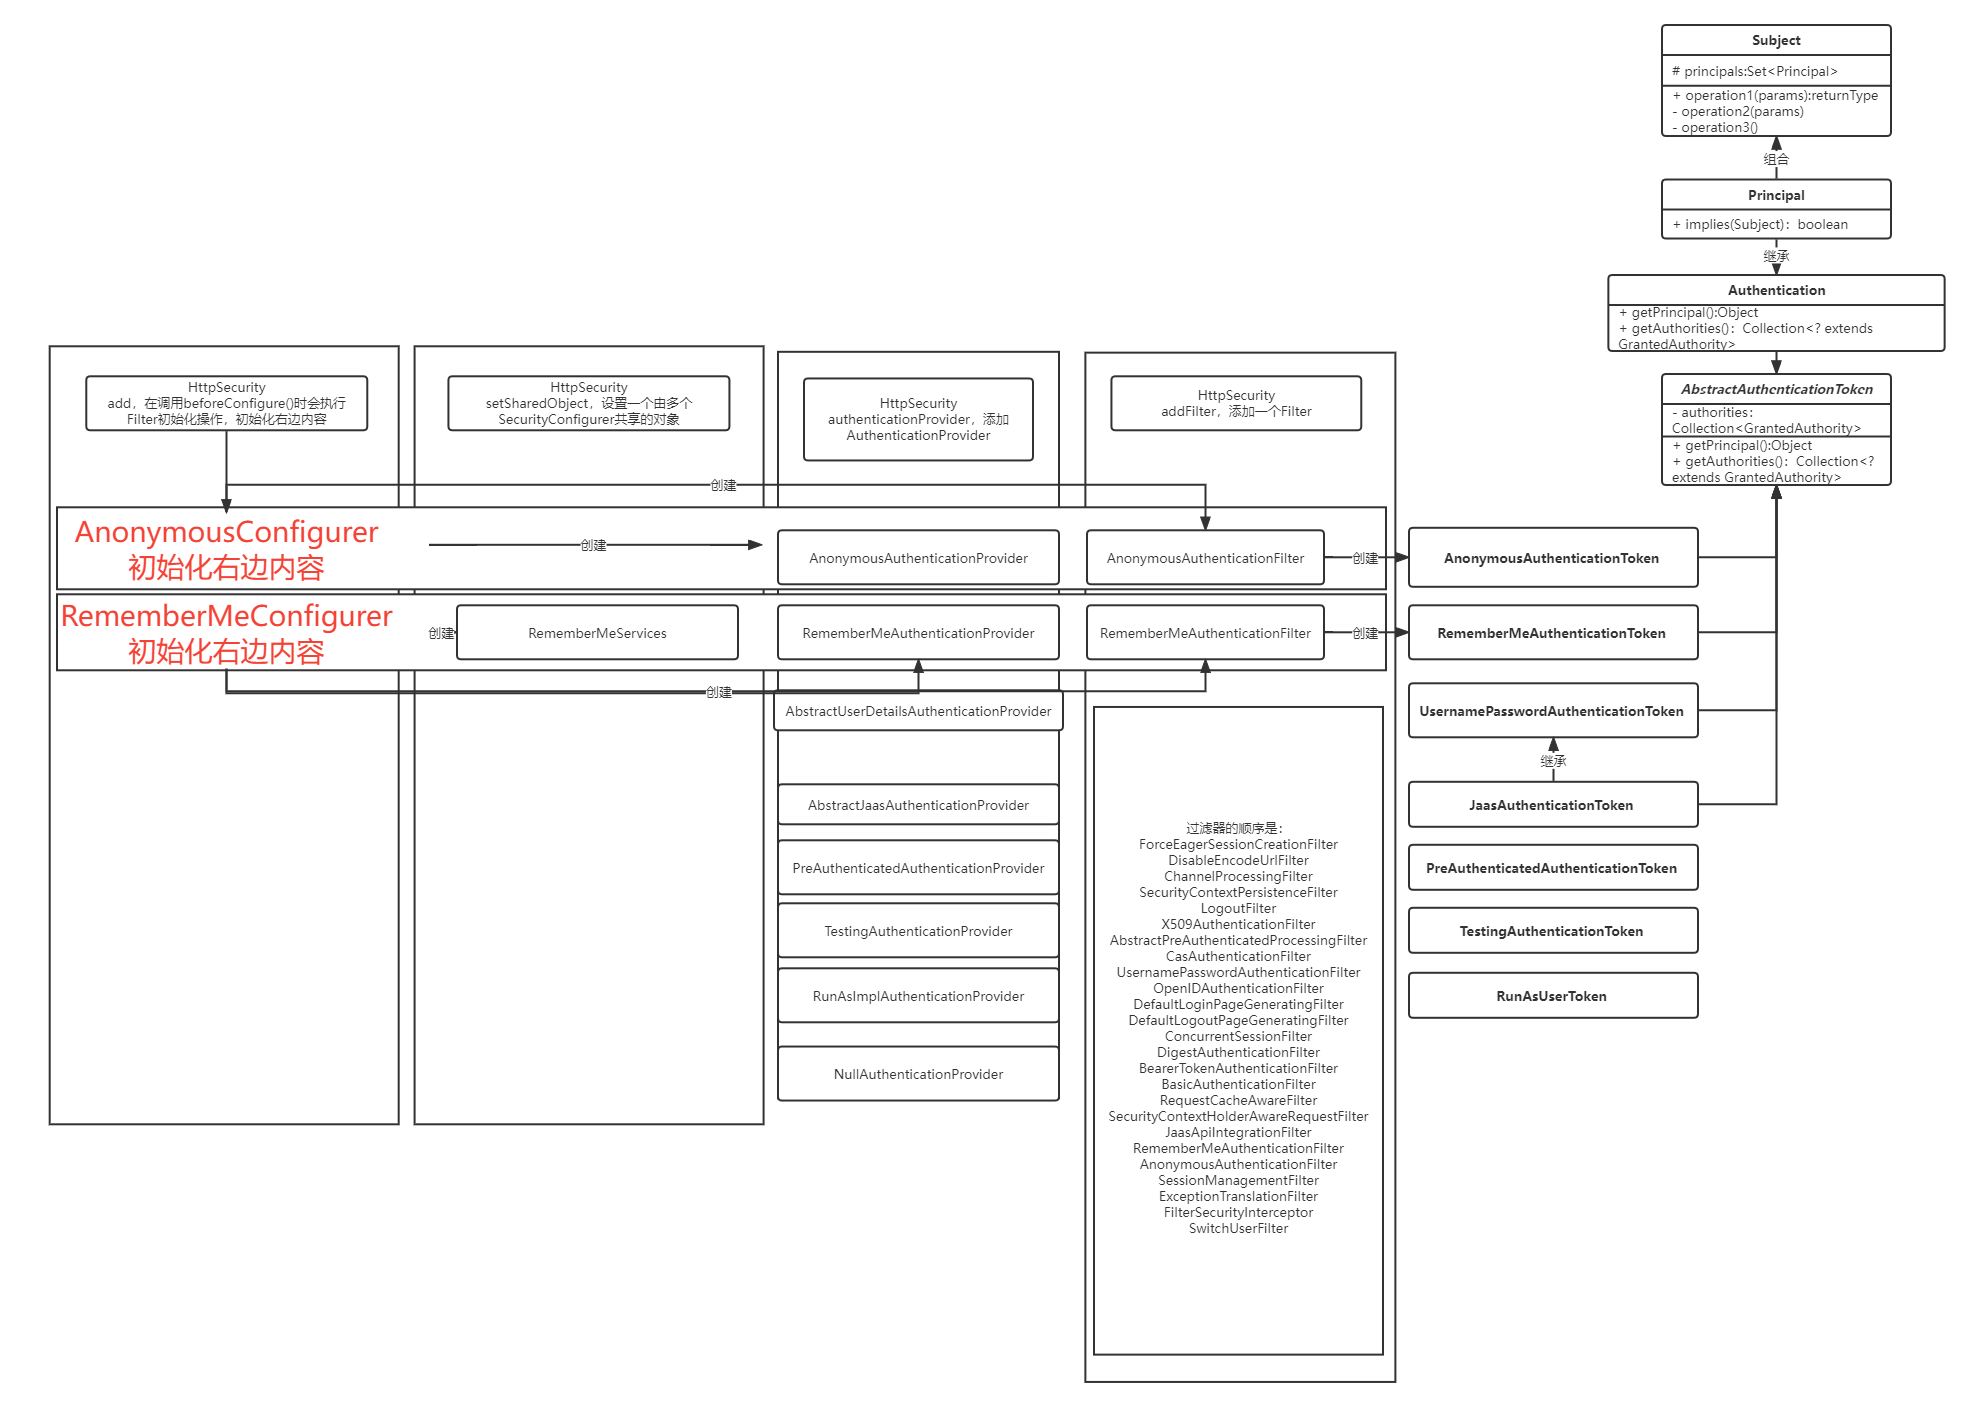
认证初始化阶段三大核心类
AuthenticationManagerBuilder用于:- 会生产 AuthenticationManager,
UsernamePasswordAuthenticationFilter就是将用于授权逻辑委派给AuthenticationManager进行处理 - 创建全局
AuthenticationManager,用于子处理器无法处理认证(Authentication)请求时进行处理。 - 保存认证所需全部的
AuthenticationProvider。AuthenticationProvider用于AuthenticationManager(认证处理器)进行认证。 - 初始化
defaultUserDetailsService,即默认如何根据用户名查询角色权限信息。 - 初始化
AuthenticationEventPublisher
- 会生产 AuthenticationManager,
WebSecurity 用于:
- 生产
FilterChainProxy,springsecurity封装的一组 **SecurityFilterChain** 的代理,用来控制FilterChain的执行逻辑 ignoredRequests,不进行访问控制(认证、授权)的请求securityFilterChainBuildersFilterSecurityInterceptor授权HttpFirewall拒绝策略,在进入过滤器链前先判断RequestRejectedHandler,请求拒绝处理器,过滤器报异常时调用,无默认DefaultWebSecurityExpressionHandler
- 生产
HttpSecurity 用于:
- 生产
SecurityFilterChain requestMatcher请求匹配,用于判断该请求是否走了过滤器OrderedFilter,经过排序的 WebSecurity 中 securityFilterChainBuilders 建造的过滤器AuthenticationManager,内置一组 AuthenticationProvider 用于认证。
- 生产
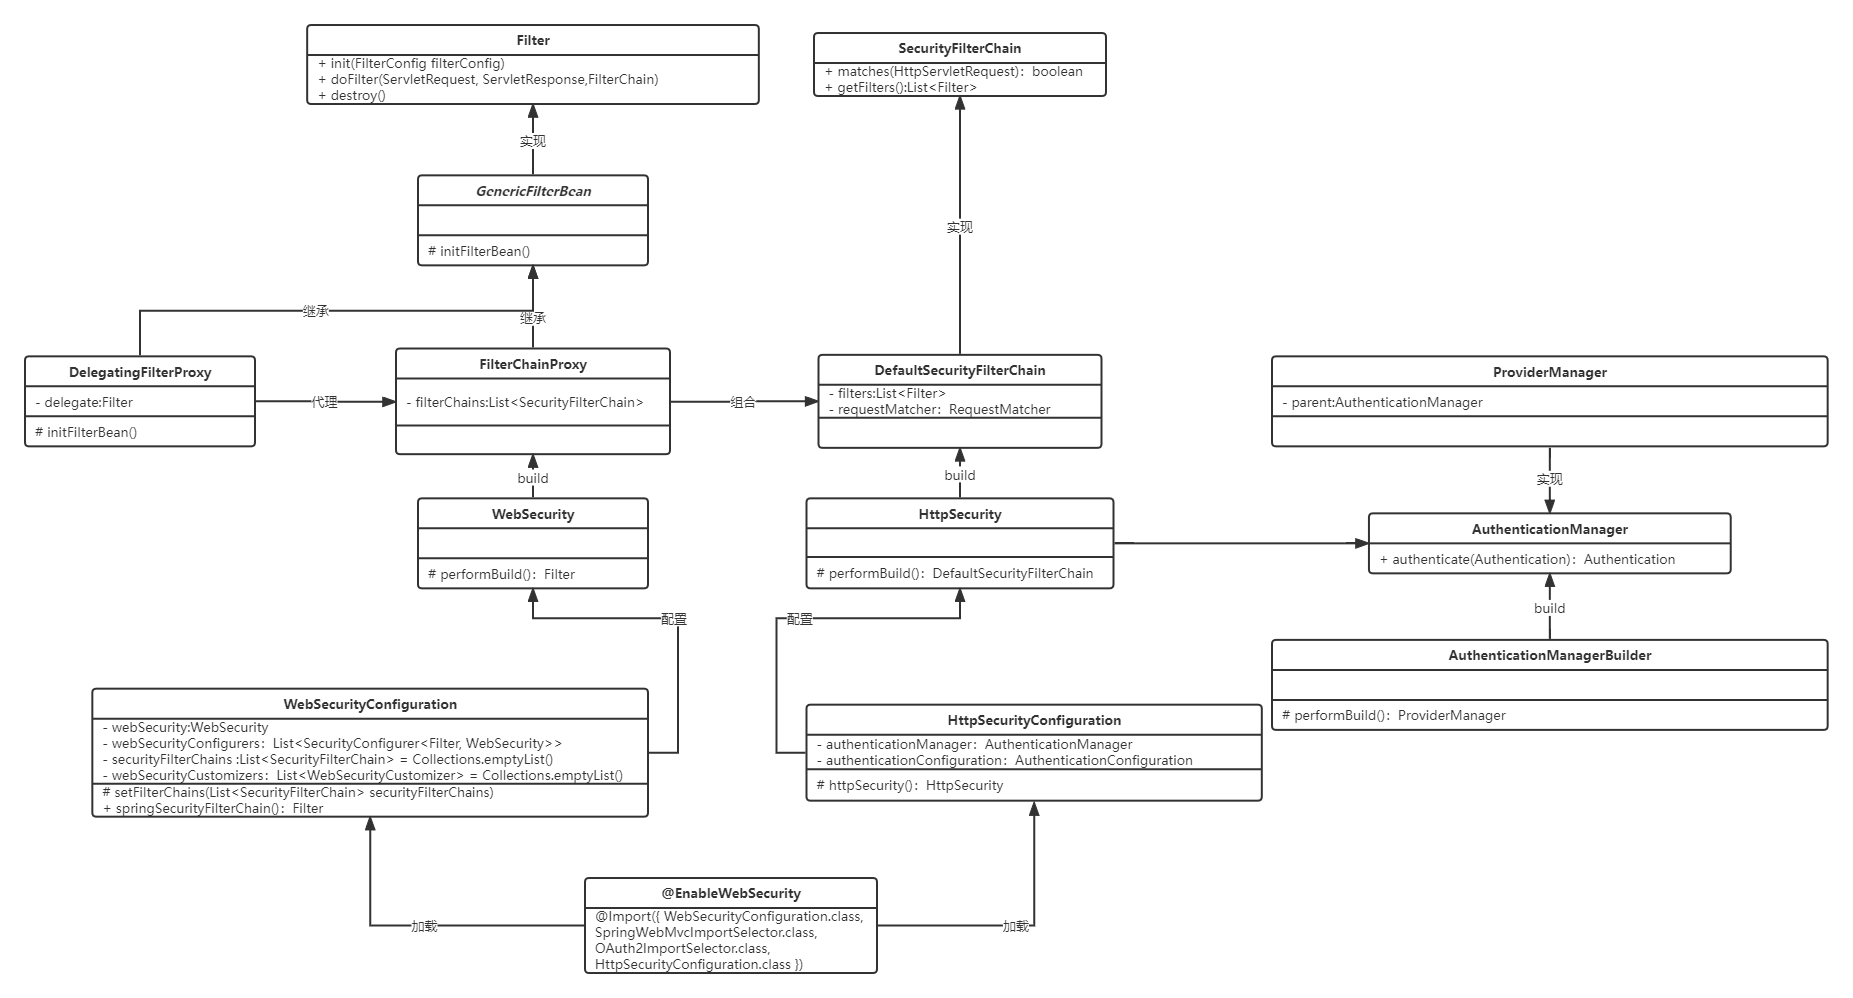
FilterChainProxy 与 SecurityFilterChain 与 FilterSecurityInterceptor
**FilterChainProxy中组合了DefaultSecurityFilterChain**。
FilterChainProxy 相当于一组过滤器的代理。
我们通过 @Bean 注入一个 SecurityFilterChain 对象相当于将自定义的 SecurityFilterChain 注入到 FilterChainProxy 持有的一组过滤器的代理中。
FilterSecurityInterceptor 也是一个 Filter
SecurityFilterChain 创建
FilterOrderRegistration构造方法将springSecurity自定义过滤器及顺序注册进来- 通过 HttpSecurityConfiguration 创建
HttpSecurity名为httpSecurity的spring bean - 创建
HttpSecurity的过程中调用performBuild()中http.方法将springSecurity自定义过滤器放入HttpSecurity的filters中 HttpSecurity调用performBuild创建DefaultSecurityFilterChain,并将HttpSecurity的filters中所有的springSecurity自定义过滤器放入DefaultSecurityFilterChain的filters中
FilterChainProxy。
初始化
@EnableWebSecurity注解导入WebSecurityConfiguration.class,HttpSecurityConfiguration.classWebSecurityConfiguration中,setter方法setFilterChainProxySecurityConfigurer过程中创建WebSecurity的实例WebSecurityConfiguration中,创建了名为springSecurityFilterChain的FilterChainProxy的bean,该bean是由WebSecurity调用build方法创建的- build 的过程中会创建
FilterChainProxy对象,并将全量的securityFilterChains组合到对象中 DelegatingFilterProxy会代理名为springSecurityFilterChain的FilterChainProxy的bean
认证
- 调用
DelegatingFilterProxy的doFilter会调用FilterChainProxy中的doFilter - 调用
FilterChainProxy中的doFilterInternal创建VirtualFilterChain,将FilterChain(系统自带过滤器)和SecurityFilterChain(spring Security自带过滤器链和自定义过滤器链)组合,依次调用 SecurityFilterChain中有一个关键的Filter即UsernamePasswordAuthenticationFilter,控制登录行为
- 调用
FilterSecurityInterceptor 授权
FilterSecurityInterceptor- 内置成员变量
AccessDecisionManager,有以下实现AffirmativeBasedConsensusBasedUnanimousBased
FilterSecurityInterceptor调用AccessDecisionManager.decide(authenticated, object, attributes)后- 获取全部参与投票的
AccessDecisionVoter,进行判断
- 内置成员变量
MethodSecurityInterceptor
核心流程代码
实现自定义功能的 UsernamePasswordAuthenticationFilter
写一个子类
MyFilter继承UsernamePasswordAuthenticationFilter,重写attemptAuthentication(HttpServletRequest request, HttpServletResponse response)方法,增加想要的功能,调用父类attemptAuthentication方法public class MyFilter extends UsernamePasswordAuthenticationFilter { @Override public Authentication attemptAuthentication(HttpServletRequest request, HttpServletResponse response) throws AuthenticationException { if (!request.getMethod().equals("POST")) { throw new AuthenticationServiceException("Authentication method not supported: " + request.getMethod()); } if (!MediaType.APPLICATION_JSON_VALUE.equalsIgnoreCase(request.getContentType())) { return super.attemptAuthentication(request, response); } Map map = null; try { map = new ObjectMapper().readValue(request.getInputStream(), Map.class); } catch (IOException e) { throw new BusinessException(ResponseCode.FAIL); } String username = (String) map.get(getUsernameParameter()); String password = (String) map.get(getPasswordParameter()); UsernamePasswordAuthenticationToken authRequest = UsernamePasswordAuthenticationToken.unauthenticated(username, password); // Allow subclasses to set the "details" property setDetails(request, authRequest); return this.getAuthenticationManager().authenticate(authRequest); } }注册将
MyFilter@Bean public LoginFilter loginFilter(AuthenticationManager authenticationManager, RememberMeServices rememberMeServices) { LoginFilter loginFilter = new LoginFilter(); loginFilter.setFilterProcessesUrl("/login"); loginFilter.setUsernameParameter("username"); loginFilter.setPasswordParameter("password"); loginFilter.setAuthenticationManager(authenticationManager); loginFilter.setAuthenticationSuccessHandler((request, response, authentication) -> { response.setContentType(MediaType.APPLICATION_JSON_UTF8_VALUE); response.setStatus(HttpServletResponse.SC_OK); response.getWriter().println(new ObjectMapper().writeValueAsString(new RestResult<>(authentication.getPrincipal()))); }); loginFilter.setAuthenticationFailureHandler((request, response, exception) -> { response.setContentType(MediaType.APPLICATION_JSON_UTF8_VALUE); response.setStatus(HttpServletResponse.SC_UNAUTHORIZED); response.getWriter().println(new ObjectMapper().writeValueAsString(new RestResult<>(ResponseCode.LOGIN))); }); return loginFilter; }替换
SecurityFilterChain中UsernamePasswordAuthenticationFilter@Bean public SecurityFilterChain filterChain(HttpSecurity http, MyFilter myFilter) throws Exception { http.addFilterAt(myFilter, UsernamePasswordAuthenticationFilter.class); return http.build(); }
用户登录信息存储方式
一旦认证成功后将 Authentication ``authResult 保存在了 SecurityContextHolder 中。
将 Authentication 中 authenticated 属性设置为 true ,安全拦截器都会对他放行
protected void successfulAuthentication(HttpServletRequest request, HttpServletResponse response, FilterChain chain,
		Authentication authResult) throws IOException, ServletException {
	SecurityContext context = SecurityContextHolder.createEmptyContext();
	context.setAuthentication(authResult);
	SecurityContextHolder.setContext(context);
}
认证的核心代码
UsernamePasswordAuthenticationToken authRequest = UsernamePasswordAuthenticationToken.unauthenticated(username,
      password);
// Allow subclasses to set the "details" property
setDetails(request, authRequest);
return this.getAuthenticationManager().authenticate(authRequest);
this.getAuthenticationManager().authenticate(authRequest) 中调用 UserDetailsService 中 loadUserByUsername(String username) 查询用户的密码及权限信息,并封装成 UserDetails 对象,在调用 additionalAuthenticationChecks(UserDetails userDetails)方法中, 调用 DaoAuthenticationProvider 中 UsernamePasswordAuthenticationToken authentication) 进行密码校验,并将 AbstractAuthenticationToken 中 authenticated(已登录状态)设置为 true
密码自动升级配置方式及说明
通过注入
UserDetailsPasswordService实现类通过前缀名识别密码,通过前缀名修改加密方式,再进行加密保存
@Bean
public UserDetailsPasswordService userDetailsPasswordService() {
    return new UserDetailsPasswordService() {
        @Override
        public UserDetails updatePassword(UserDetails user, String newPassword) {
            userService.updateUserPassword(user.getUsername(), newPassword);
            return user;
        }
    };
}
由于检测到加密方式改变会自动改变密码,当
springsecurity升级时,修改了默认加密方式也不用修改代码
public static PasswordEncoder createDelegatingPasswordEncoder() {
   String encodingId = "bcrypt";
   Map<String, PasswordEncoder> encoders = new HashMap<>();
   encoders.put(encodingId, new BCryptPasswordEncoder());
   encoders.put("ldap", new org.springframework.security.crypto.password.LdapShaPasswordEncoder());
   encoders.put("MD4", new org.springframework.security.crypto.password.Md4PasswordEncoder());
   encoders.put("MD5", new org.springframework.security.crypto.password.MessageDigestPasswordEncoder("MD5"));
   encoders.put("noop", org.springframework.security.crypto.password.NoOpPasswordEncoder.getInstance());
   encoders.put("pbkdf2", new Pbkdf2PasswordEncoder());
   encoders.put("scrypt", new SCryptPasswordEncoder());
   encoders.put("SHA-1", new org.springframework.security.crypto.password.MessageDigestPasswordEncoder("SHA-1"));
   encoders.put("SHA-256",
         new org.springframework.security.crypto.password.MessageDigestPasswordEncoder("SHA-256"));
   encoders.put("sha256", new org.springframework.security.crypto.password.StandardPasswordEncoder());
   encoders.put("argon2", new Argon2PasswordEncoder());
   return new DelegatingPasswordEncoder(encodingId, encoders);
}
PasswordEncoderFactories中,会将BCryptPasswordEncoder作为默认的Encoder因此没有必要手动注入
PasswordEncoder@Bean public PasswordEncoder passwordEncoder() { return new BCryptPasswordEncoder(); }
RememberMe 配置方式及说明
服务端 session30 分钟就过期了,此时客户端携带 cookie 请求服务端受保护资源需重新登录
rememberMe 开启会将认证信息放到 cookie 中,如果 session 过期,服务端会解密 cookie,而不用重新登录。
LoginFilter中增加/** * @author sakura */ public class LoginFilter extends UsernamePasswordAuthenticationFilter { @Autowired private RememberMeServices rememberMeServices; @Override public Authentication attemptAuthentication(HttpServletRequest request, HttpServletResponse response) throws AuthenticationException { //其他代码略 if (rememberMeServices instanceof PersistentTokenBasedRememberMeServices) { String rememberMeParameterName = ((PersistentTokenBasedRememberMeServices) rememberMeServices).getParameter(); String rememberMe = (String) map.get(rememberMeParameterName); request.setAttribute(rememberMeParameterName, rememberMe); } //其他代码略 } }SecurityConfig中增加/** * 持久化series * @param dataSource * @return */ @Bean public PersistentTokenRepository persistentTokenRepository(DataSource dataSource) { return new JdbcTokenRepositoryImpl() { { setDataSource(dataSource); // 第一次创建表才需要 // setCreateTableOnStartup(true); } }; } /** * 记住我,重写了判断【前端传递记住我参数】是否开启。 * @param userDetailsService * @param persistentTokenRepository * @return */ @Bean public RememberMeServices rememberMeServices(UserDetailsService userDetailsService, PersistentTokenRepository persistentTokenRepository) { return new PersistentTokenBasedRememberMeServices(UUID.randomUUID().toString(), userDetailsService, persistentTokenRepository) { protected boolean rememberMeRequested(HttpServletRequest request, String parameter) { Object paramValue = request.getAttribute(parameter); if (paramValue != null && paramValue instanceof String) { String attribute = (String) paramValue; if (attribute.equalsIgnoreCase("true") || attribute.equalsIgnoreCase("on") || attribute.equalsIgnoreCase("yes") || attribute.equals("1")) { return true; } } return false; } }; } @Bean public AuthenticationManager authenticationManager(AuthenticationConfiguration authenticationConfiguration) throws Exception { return authenticationConfiguration.getAuthenticationManager(); } @Bean public LoginFilter loginFilter(AuthenticationManager authenticationManager, RememberMeServices rememberMeServices) { LoginFilter loginFilter = new LoginFilter(); loginFilter.setFilterProcessesUrl("/login"); loginFilter.setUsernameParameter("username"); loginFilter.setPasswordParameter("password"); //第一次登录,勾选记住我则触发PersistentTokenRepository持久化 loginFilter.setAuthenticationManager(authenticationManager); loginFilter.setRememberMeServices(rememberMeServices); loginFilter.setAuthenticationSuccessHandler((request, response, authentication) -> { response.setContentType(MediaType.APPLICATION_JSON_UTF8_VALUE); response.setStatus(HttpServletResponse.SC_OK); response.getWriter().println(new ObjectMapper().writeValueAsString(new RestResult<>(authentication.getPrincipal()))); }); loginFilter.setAuthenticationFailureHandler((request, response, exception) -> { response.setContentType(MediaType.APPLICATION_JSON_UTF8_VALUE); response.setStatus(HttpServletResponse.SC_UNAUTHORIZED); response.getWriter().println(new ObjectMapper().writeValueAsString(new RestResult<>(ResponseCode.LOGIN))); }); return loginFilter; } @Bean public SecurityFilterChain filterChain(HttpSecurity http, LoginFilter loginFilter, RememberMeServices rememberMeServices) throws Exception { http.authorizeRequests() .anyRequest().authenticated() .and().formLogin() .and().exceptionHandling().authenticationEntryPoint((request, response, exception) -> { response.setContentType(MediaType.APPLICATION_JSON_UTF8_VALUE); response.setStatus(HttpServletResponse.SC_UNAUTHORIZED); response.getWriter().println(new ObjectMapper().writeValueAsString(new RestResult<>(ResponseCode.UN_LOGIN))); }) .and().logout().logoutUrl("/logout").logoutSuccessHandler((request, response, authentication) -> { response.setContentType(MediaType.APPLICATION_JSON_UTF8_VALUE); response.setStatus(HttpServletResponse.SC_OK); response.getWriter().println(new ObjectMapper().writeValueAsString(new RestResult<>())); }) .and().rememberMe().rememberMeServices(rememberMeServices) .and().csrf().disable(); http.addFilterAt(loginFilter, UsernamePasswordAuthenticationFilter.class); return http.build(); }@Bean public PersistentTokenRepository persistentTokenRepository(DataSource dataSource) { return new JdbcTokenRepositoryImpl() { { setDataSource(dataSource); // 第一次创建表才需要 // setCreateTableOnStartup(true); } }; }Remember-me token中存在用:分隔的两段,第一段为series,第二段为token。spring secrity会根据series去persistent_logins表中查询token,如果表中token和Remember-me token中第二段token一致校验通过。Remember-me token的过期时间为两周,根据去persistent_logins表中所存储的日期判断token是否过期根据去
persistent_logins表中所存储的用户名,通过loadUserByUsername(String username)查询出用户信息及权限
Csrf 配置方式及说明
当携带 header 中携带 XSRF-TOKEN 参数时,springsecurity 不会返回一个新的 csrf token。
CsrfToken csrfToken = this.tokenRepository.loadToken(request);
		boolean missingToken = (csrfToken == null);
		if (missingToken) {
			csrfToken = this.tokenRepository.generateToken(request);
			this.tokenRepository.saveToken(csrfToken, request, response);
		}
Oauth2 授权码模式说明
- 应用客户端
- 资源服务器
- 授权服务器
- 用户在应用客户端(浏览器、移动设备或者服务器)上,请求资源服务器受保护资源,由于未携带资源 token 令牌无法登陆,故点击使用第三方登录
- 应用客户端通过用户代理(浏览器)向授权服务器发送获取授权码的请求,携带客户端 client id,授权方式,重定向 url。
- 授权服务器通过用户代理(浏览器)展示出是否授权应用客户端某些权限。如:读、写、可读可写。
- 用户代理(浏览器)点击提交后,向授权服务器提交权限
- 如果拒绝,则拒绝授权
- 如果允许,通过(1)中重定向 url,url 中携带授权码(此授权码是与登录用户关联的)返回给客户端
- 客户端拿到授权码后,携带客户端 client id、客户端密钥、重定向 url(与请求授权码时设置的重定向 URL 一样)、授权码向授权服务器发送请求
- 授权服务器返回客户端查询资源 token 令牌
- 客户端携带资源 token 令牌访问资源服务器
- 授权服务器使用资源 token 令牌在资源服务器中进行操作
没搞懂 ObjectPostProcessor 是干嘛的
http.apply(new UrlAuthorizationConfigurer(http.getSharedObject(ApplicationContext.class)).withObjectPostProcessor(new ObjectPostProcessor<FilterSecurityInterceptor>() {
    @Override
    public <O extends FilterSecurityInterceptor> O postProcess(O object) {
        object.setSecurityMetadataSource(mySecurityMetadataSource);
        AccessDecisionManager accessDecisionManager = object.getAccessDecisionManager();
        if (accessDecisionManager instanceof AbstractAccessDecisionManager) {
            ((AbstractAccessDecisionManager) accessDecisionManager).getDecisionVoters().add(new MyDecisionVoter());
        }
        object.setRejectPublicInvocations(true);
        return object;
    }
}));